If you own website and you want to get high page rankings in the search results, then you are going to need to connect your website to the Google Search Console. Not only will your site rank higher, Google Search Console also provides a lot of useful information. To get hold of these benefits you are going to have to verify the ownership of your website. If you don’t have a clue what I’m talking about, don’t worry as I’m going to show you right now in this, how to verify your WordPress website in Google Search Console, blog post.

Getting your website verified is actually a very simple process, you will get a bit of code from google that you need to copy and paste into your website.
The easiest way to do this without getting too technical is to use one of the many optional free plugins. The plugin that we are going to use is called Header Footer Code Manager and it’s developed by 99 robots.
Anyways here are the steps on how to verify your WordPress website in Google Search Console
The first thing you want to do is to log in to the back end of your website and go to the plug in section. Click on add new and just type in the words Header Footer Code Manager and press enter.
A bunch of plugins will come up, you can really choose which one you like, but in my opinion Header Footer Code Manager is the most user friendly.
Press install now and once the installation is complete then you’d press activate. The plugin will now be on your website. Now go back to the installed plug in section of your website and locate the plugin that you’ve just installed.
Click on settings and then you want to click on add new snippet.
-In the Snippet Name box you can just type in verification.
-In the Site Display box choose Site Wide
-Leave the Exclude Posts and Exclude Pages box blank
-In the Location Box choose Header ( if this says footer just change it to header )
-In the Device Display box choose Show On All Devices
-In the Status box choose Active
Now we’re going to have to paste a code in the Snippet/Code box.
So where do we get this code from, well first make sure that you’re logged in to your google account.
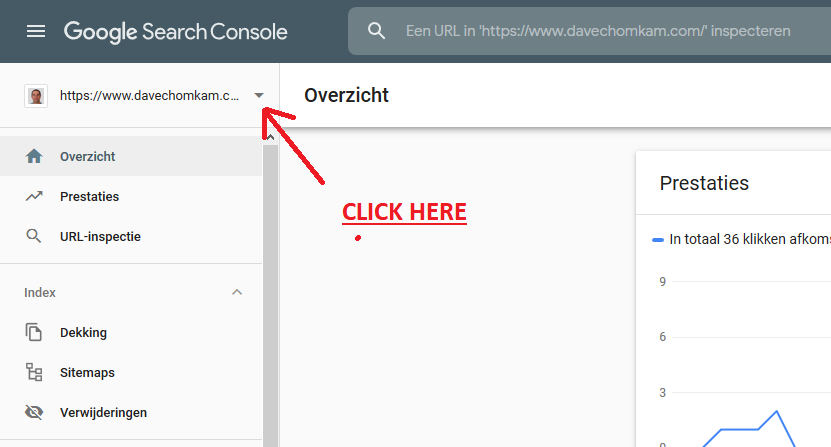
Then do a google search for Google Search Console. Once you’re logged in, locate the little arrow drop down box in the top left corner of your screen.

-Click on the little arrow and choose Add Property
-Click on the url Prefix button
-Now go back to your website and in the search bar copy everything until .com ===> example https://www.yourdomainname.com
-Go back to Google Search Console and paste it in the url Prefix box and press continue
-A new box will open (Verify Ownership), scroll down and choose HTML tag and click the little drop down arrow
-Copy the code inside the drop down box
-Go back to your website and paste the code inside the Snippet/Code box
If you have a security plugin installed on your website it could give you a warning. If you do get this warning, don’t panic and just continue as this is absolutely safe.
The last thing you need to do is go back to Google Search Console and click the verify button in the Verify Ownership box.
Sometimes it doesn’t work right away but in most cases Google will verify your website within seconds.
That’s it you’re done, that’s all you got to do. You’re website is now verified by Google and it’s time for you to get some quality content out there and get yourself some high rankings in the search engines.


Was it mandatory to very our blog in search console, we need to update XML Site mapy manually for a wordpress blog
Hey Praveen,
It’s not mandatory to verify your blog in the search console BUT it will definitely speed up the process to get your site found by the “search engine crawlers” and get your site indexed. And it’s certainly a good idea to provide an XML sitemap. Once you’ve created your sitemap it should be updated automatically every time you release a new blog post.